Ready to run O gauge models that are suitable for battery conversion are not introduced very often, so Heljan's recent production of a Class 47 model was awaited with interest. As built, the model is intended to be powered by the conventional two rail system. The club's layout has no power, so to run at Brambleton, batteries and radio control would have to be installed.
The photo below shows the body removed from the new model. Given that the Class 47 is a fairly large loco, it was expected there would be plenty of space for the batteries, radio receiver and speed controller. In fact this turned out to be not the case. Most of the interior is taken up with a metal casting that forms the base of the body. Each of the two vertically mounted motors have large flywheels. In addition to this, there is also a circuit board that brings together the various connections to the pick ups, motors, lights and fan motor.

Testing revealed that the model drew between 0.5 and 2.0 Amps. Recharageable NiMH AA batteries are available in capacities up to 2.5AH, so these should give at least an hour's running time. 10 batteries are required to provide 12V.
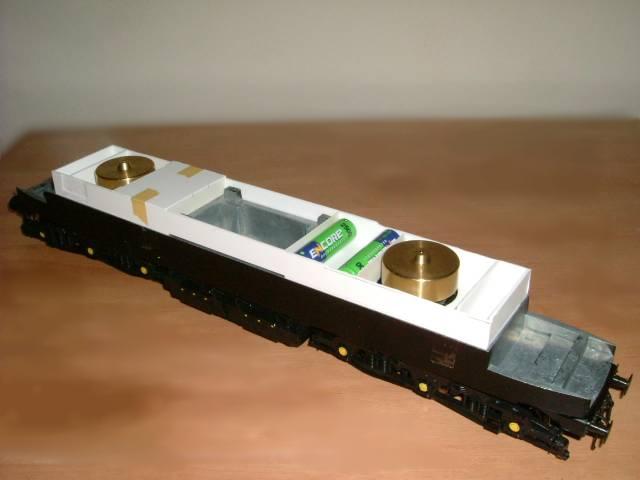
Working out how these batteries could be fitted into the body was a challenge. It was soon decided that the circuit board would have to go. Three AA batteries could just be fitted between each flywheel and the central casting. A single battery could be fitted between each flywheel and the back of the cabs. Fortunately there was just space for the two remaining batteries above the block of three batteries towards the No 2 end of the loco. (The equivalent space at the No 1 end was taken by the motor for the fans.)
A battery holder was constructed from plasticard.

The batteries were wired together in series and glued into the holder. The photo below shows how the holder fits into the body.

As well as the batteries a number, of other components still have to be added.
A fuse
A radio receiver is needed to decode signals from the radio control transmitter.
A speed controller is needed to control power to the motors is response to the output from the receiver.
An on/off swich and charging socket, preferably in an accessible but not too visible location.
A replacement for the original Heljan circuit board. The original circuit board contained current limiting resistors for the lights (LEDs) and a voltage controller for the fan motor.
The speed controller used was a home-made item constructed on Veroboard. This fitted nicely in the central well of the metal body casting. A brass frame was made to mount it off the holes originally used for the Heljan circuit board. The fuse was also mounted in this well.
The receiver fitted quite nicely in the space underneath the casting, between the bogies.
It was decided to mount the on/off switch above one of the inner axles. The charging socket would be mounted next to it. The brass bracket that supports them is shown in the photo below.

The next item to be dealt with was the replacement for the original Heljan circuit board. The original circuit board provided a voltage controller for the fan motor and current limiting resistors for the LED lights. The speed controller used has three auxilary outputs that can control lights and a fan. (One of the advantages of radio control is that the lights can stay on even if the loco isn't moving). The voltage output from the sped controller for the lights and fan was 8 volts.
The original Heljan circuit board regulated the voltage for the fan motor to around 2.5V. This regulator would need to be replicated on a new circuit board. When driven at 2.5V, the fan motor seemed quite noisy, so the fan motor voltage was reduced down to around 1.5V. The original current limiting resistors would also need to be replicated.
There was not enough space do do all this on a single circuit board. Instead, the current limiting resistors for the lights at one end were split off onto a separate board. The photos below show these boards as installed.


The wires from these circuit boards were brought together onto a four way connector that allowed the body to be easily removed from the chassis if required. The other half of the connector was wired back to the speed controller.
The photo below shows the completed chassis assembly. The sections of the battery box that can be seen through the bodyside windows have been painted black.

The final touches were adding the headcode blanking plate and the transfers. Heljan suppied a photocopied paper sheet containing sample headcodes. However the LEDs in the headcode box are fairly bright so it is likely that the LEDs would have shone through the blacked out parts of the headcode. A metal plate was cut and plainted black to use instead.
The photos below shows the completed loco.

